Getting Started
Free DownloadWhat is ThemeCanvas Locations?
ThemeCanvas Locations for Elementor with OpenStreetMap is a powerful WordPress plugin that enables you to display interactive maps on your website using the Elementor page builder. Built with OpenStreetMap integration, it provides a free, open-source mapping solution with no API keys required.
The plugin comes in two versions:
- Free Version: Create beautiful maps with manually added location markers
- Pro Version: Dynamically load locations from WordPress posts/CPTs with advanced management features
Free vs Pro Comparison
| Feature | Free | Pro |
|---|---|---|
| Manual Location Entry | ✓ | ✓ |
| Unlimited Markers | ✓ | ✓ |
| Custom Map Styling | ✓ | ✓ |
| Marker Clustering | ✓ | ✓ |
| Custom Popups | ✓ | ✓ |
| Dynamic Location Loading (Posts/CPTs) | — | ✓ |
| Built-in Locations Custom Post Type | — | ✓ |
| Visual Map Metabox for Posts | — | ✓ |
| Address Geocoding & Search | — | ✓ |
| Custom Pin Colors | — | ✓ |
| Post Type Manager | — | ✓ |
| ACF Field Integration | — | ✓ |
| Advanced Query Controls | — | ✓ |
System Requirements
- WordPress: 5.0 or higher
- PHP: 7.4 or higher
- Elementor: 3.0.0 or higher (required)
- Elementor Pro: Not required
Installation
Installing the Free Version
- Log in to your WordPress admin dashboard
- Navigate to Plugins → Add New
- Search for "ThemeCanvas Locations for Elementor"
- Click Install Now on the plugin
- After installation, click Activate
Installing the Pro Version
- Download the Pro plugin ZIP file from your purchase confirmation email
- Log in to your WordPress admin dashboard
- Navigate to Plugins → Add New → Upload Plugin
- Click Choose File and select the downloaded ZIP file
- Click Install Now
- After installation, click Activate
- Navigate to TC Locations → License to activate your license key
First Steps
Once installed, you can start using the plugin in two ways:
- Free Version: Add the widget to any Elementor page and manually enter location coordinates
- Pro Version: Set up the Locations CPT in TC Locations → Settings, then add locations with the visual map interface
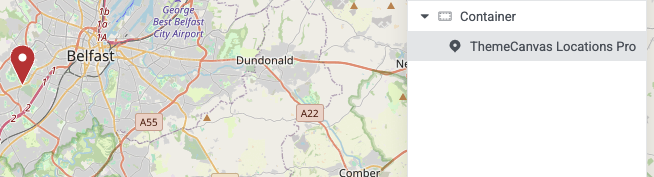
ThemeCanvas Locations widget in Elementor sidebar
Manual Locations Mode (Free)
Manual Locations mode allows you to add location markers directly within the Elementor widget settings. This is the primary method for the Free version and is perfect for displaying a fixed set of locations like store locations, office addresses, or points of interest.
Adding the Widget
- Edit any page or post with Elementor
- In the left sidebar, search for "ThemeCanvas Locations" or find it under the "General" category
- Drag the widget onto your page
Dragging the widget onto the Elementor canvas
Widget Settings Overview
Location Source
Set the Location Source to Manual. This enables manual location entry mode.
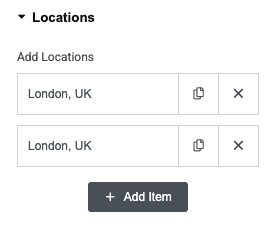
Adding Locations
- Click the Add Location button
- For each location, enter the following:
Required Fields
| Field | Description | Example |
|---|---|---|
| Latitude | Geographic latitude coordinate (-90 to 90) | 51.5074 |
| Longitude | Geographic longitude coordinate (-180 to 180) | -0.1278 |
Optional Fields
| Field | Description |
|---|---|
| Title | Location name shown in popup (e.g., "London Office") |
| Description | Additional information displayed in popup. Supports HTML. |
Example: Adding a Location
Title: London Office
Latitude: 51.5074
Longitude: -0.1278
Description: Our main office in central London.
Open Mon-Fri, 9am-5pm.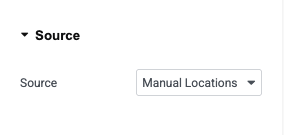
Manual location entry fields
Popup Customization
Each location marker can display a popup when clicked. You can customize the content using HTML:
Basic Example
<h3>Store Name</h3>
<p>123 Main Street<br>
London, UK<br>
Phone: 020 1234 5678</p>
Advanced Example with Link
<h3>London Headquarters</h3>
<p>Visit us at our main office</p>
<a href="/contact" target="_blank">Get Directions</a>Managing Multiple Locations
You can add unlimited locations to a single map:
- Click Add Location to add more markers
- Drag and drop locations to reorder them
- Click the delete icon to remove a location
- Duplicate a location using the duplicate button
Multiple locations with reorder handles
Dynamic Locations Mode (Pro)
PRO FEATUREDynamic Locations mode allows you to automatically load location markers from WordPress posts or custom post types. This is ideal for displaying locations that are managed as content, enabling you to add/edit locations from the WordPress admin without touching the Elementor page.
Setting Up Dynamic Mode
Step 1: Set Location Source
In the widget settings, set Location Source to Posts.

Selecting "Posts" as the location source
Step 2: Select Post Type
Choose which post type contains your location data:
- Locations (plugin's built-in CPT - recommended)
- Posts (WordPress default)
- Pages
- Any Custom Post Type (Products, Events, etc.)
Step 3: Field Mapping
Tell the plugin which custom fields contain the latitude/longitude data:
Using Plugin Fields (Automatic)
If you're using the plugin's built-in CPT or have enabled the metabox on your post type, the fields will auto-populate to:
- Latitude Field:
_lmfe_latitude - Longitude Field:
_lmfe_longitude
Using Custom Fields (Manual)
If you're using your own custom fields (e.g., via ACF or Metabox.io):
- Enter your latitude field name (e.g.,
location_lat) - Enter your longitude field name (e.g.,
location_lng)
Using Elementor Dynamic Tags
You can also use Elementor's dynamic tag system:
- Click the dynamic tag icon next to the field input
- Select your data source (ACF Field, Metabox Field, etc.)
- Choose the field containing coordinates
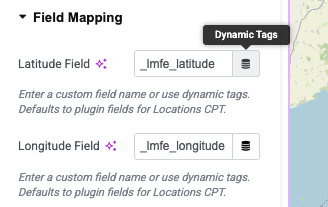
Field mapping with auto-detected plugin fields
Query Settings
Control which posts are displayed as map markers:
Posts Per Page
Set the maximum number of locations to display. Use -1 for unlimited.
Order By
Sort locations by:
- Date: Newest or oldest first
- Title: Alphabetically
- Random: Different order on each page load
- Menu Order: Custom order (if post type supports it)
Advanced Query Options
Displaying Multiple Post Types
You can display locations from multiple post types on a single map:
- In the widget settings, click the Post Types field
- Select multiple post types (e.g., "Stores", "Offices", "Branches")
- The map will display all locations from all selected types
Include Specific Posts
To show only specific locations on your map:
- Find the post IDs you want to include:
- Go to your WordPress admin → Locations (or Posts, etc.)
- Hover over a post - the ID appears in the URL (e.g.,
post=123) - Or check the "Coordinates" column for the ID
- In the widget, enter the IDs in Include Specific Posts
- Example:
123, 456, 789
Exclude Specific Posts
To hide certain locations from the map:
- Find the post IDs you want to exclude (same method as above)
- Enter the IDs in Exclude Specific Posts
- Example:
999(to hide post ID 999)
Example Queries
Show All Stores + All Offices
Post Types: Stores, Offices
Posts Per Page: -1
Order By: Title
Order: ASC
This displays all locations from both CPTs, alphabetically sorted.
Show Specific Locations Only
Post Types: Stores
Include Posts: 123, 456, 789
Posts Per Page: (ignored when using Include)
This displays only the 3 specified posts, in the order of the IDs entered.
Show All Except Hidden Locations
Post Types: Locations
Exclude Posts: 999
Posts Per Page: 50
Order By: Date
Order: DESC
This displays up to 50 locations (newest first), excluding post ID 999.
Popup Content Options
Control what displays in location popups:
Title Field
The field to use for the popup title. Options:
- Post Title: Uses the post's main title (default)
- Custom Field: Enter a field name to use instead
- Dynamic Tag: Use Elementor dynamic tags
Popup Content
What to display in the popup body:
- Post Excerpt: Show the post excerpt
- Custom Field: Display a specific custom field
- None: Title only
Example Popup Configuration
Title Field: post_title
Popup Content: Post Excerpt
Show Featured Image: Yes
Link to Post: Yes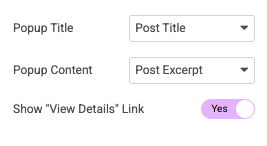
Map displaying dynamic locations from posts
Advanced Features
Custom Pin Colors (Pro)
Each location can have a unique marker color. If you've set custom pin colors in the metabox, they'll automatically be applied to the map markers.
Conditional Display
Use Elementor's native conditions to show/hide maps based on:
- User login status
- User roles
- Archive type
- Custom conditions
Custom Post Type Management (Pro)
PRO FEATUREThe Pro version includes a built-in "Locations" custom post type that's specifically designed for managing map locations. This provides a user-friendly way to create and organize locations without needing any third-party plugins.
Enabling the Locations CPT
- Navigate to TC Locations → Settings in WordPress admin
- Click the Locations CPT tab
- Add Display Name
- Add Slug
- Click Creat Location CPT

Locations CPT settings page
CPT Configuration Options
CPT Name
Customize the display name of the custom post type. Default is "Locations".
Examples:
- Stores
- Offices
- Properties
- Branches
CPT Slug
The URL-friendly version of the name. Default is "locations".
Example URLs:
yoursite.com/locations/london-office
yoursite.com/stores/manchester-branchCPT Icon
Choose a custom Dashicon for the admin menu. Available options include:
dashicons-location(default - map pin)dashicons-location-alt(alternative pin)dashicons-admin-site(building)dashicons-store(storefront)
View all Dashicons at: developer.wordpress.org/resource/dashicons
Creating a Location
Once the CPT is enabled:
- Click Your New CPT → Add New in WordPress admin
- Enter a title (e.g., "London Office")
- Optionally add content, featured image, or excerpt
- Scroll down to the Location Coordinates metabox
- Set the location coordinates (see Location Metabox section)
- Click Publish
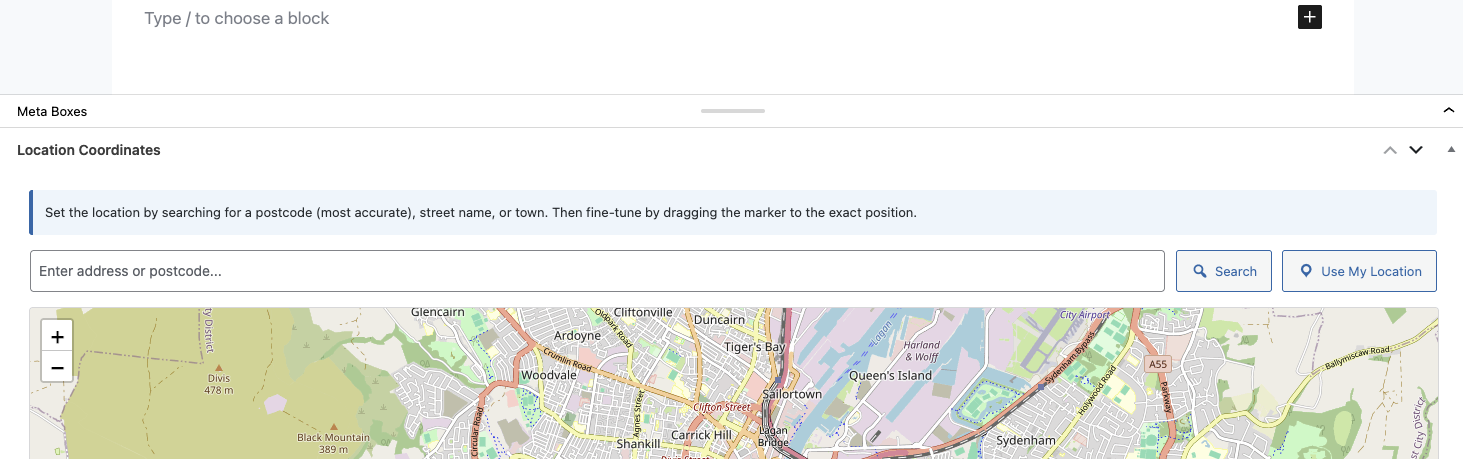
Adding a new location with map metabox
Managing Locations
Location List View
The locations list includes a custom "Coordinates" column that shows:
- Location pin icon if coordinates are set
- Latitude and longitude values
- Quick link to view on Google Maps

Locations admin list with coordinates column
Supported Features
The Locations CPT supports:
- Title and editor (description)
- Featured image
- Excerpt
- Custom fields via metabox
- Gutenberg block editor
- Public archive pages
Using with Elementor
To display locations on a map:
- Add the TC Locations Pro widget to your page
- Set Location Source to
Posts - Set Post Type to
Locations - Field names auto-populate to
_lmfe_latitudeand_lmfe_longitude - Your locations appear on the map automatically!
Disabling the CPT
If you no longer need the built-in CPT:
- Navigate to TC Locations → Settings → Locations CPT
- Uncheck Enable Built-in Locations CPT
- Click Save Changes
Post Type Manager (Pro)
PRO FEATUREThe Post Type Manager allows you to add the Location Coordinates metabox to any existing post type in WordPress. This is perfect if you want to add location functionality to your existing content without creating a new post type.
Enabling the Metabox on Post Types
- Navigate to TC Locations → Settings
- Click the Post Type Manager tab
- Check the boxes for post types where you want the metabox
- Click Save Changes
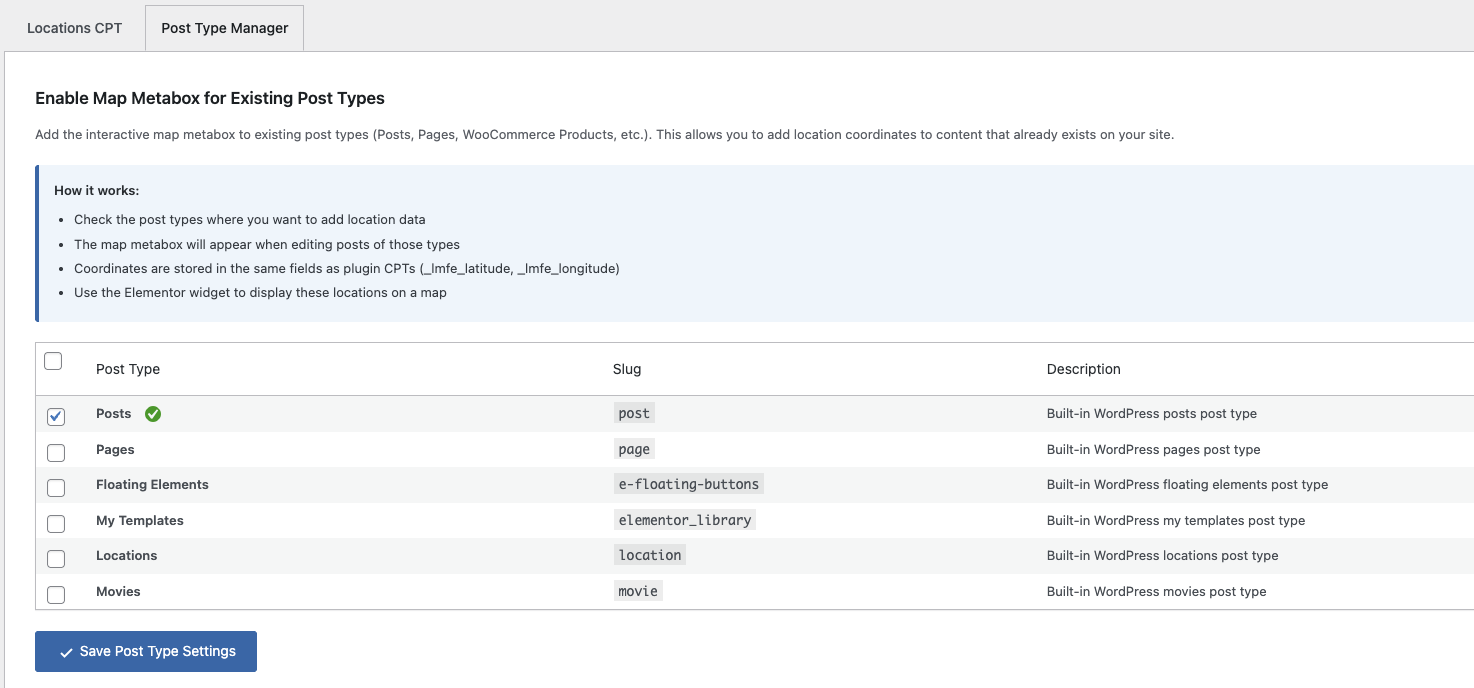
Post Type Manager settings
Supported Post Types
The metabox can be enabled on:
- Posts - WordPress default posts
- Pages - WordPress default pages
- Products - WooCommerce products (if installed)
- Any Custom Post Type - Registered by themes or plugins
Use Cases
Blog Posts with Locations
Enable the metabox on Posts to add location data to blog articles:
- Travel blog posts
- Event coverage
- Local news articles
- Restaurant reviews
WooCommerce Store Locator
Enable on Products to create a store locator showing where products are available:
- Enable metabox on "Products" post type
- Add coordinates to each product indicating store location
- Use Dynamic Locations mode to display all products on a map
- Customers can see which stores stock each product

Metabox on WooCommerce product
Real Estate Listings
If you're using a real estate plugin, enable the metabox on the property post type:
- Add exact property coordinates
- Display all properties on a searchable map
- Show nearby amenities
- Custom pin colors for property types (sale, rent, sold)
How It Works
Once enabled, the metabox appears automatically when editing any post of that type:
- Edit any post of the enabled type
- Scroll down to find the Location Coordinates metabox
- Set coordinates using the visual map interface
- Save the post - coordinates are stored as post meta
Using with Elementor Widgets
To display posts with coordinates on a map:
- Add TC Locations Pro widget to your page
- Set Location Source to
Posts - Select the post type you enabled the metabox on
- Widget auto-detects plugin fields:
_lmfe_latitude,_lmfe_longitude - Map displays all posts with coordinates!
Disabling the Metabox
To remove the metabox from a post type:
- Go to TC Locations → Settings → Post Type Manager
- Uncheck the post type
- Click Save Changes
Location Metabox (Pro)
PRO FEATUREThe Location Coordinates metabox provides a visual, user-friendly interface for setting location coordinates. Instead of manually looking up lat/lng values, you can search for addresses, drag markers, or use your browser's geolocation.
Complete metabox interface
Metabox Features Overview
- Interactive Leaflet map preview
- Address/postcode geocoding search
- Autocomplete address suggestions
- Draggable marker
- Click-to-place marker
- "Use My Location" browser geolocation
- Manual lat/lng coordinate entry
- Custom pin color picker
Using the Visual Map Interface
Method 1: Address Search (Recommended)
The easiest way to set a location:
- Type an address or postcode in the search field
- Select from autocomplete suggestions (or press Enter)
- Map zooms to the location and places a marker
- Drag the marker to fine-tune the exact position
- Coordinates auto-update in the fields below
Method 2: Click on Map
Click anywhere on the map to place the marker:
- Zoom in to your desired area using the zoom controls
- Pan by dragging the map
- Click the exact location where you want the marker
- Coordinates update automatically
Method 3: Drag Marker
Fine-tune positioning by dragging:
- Click and hold the existing marker
- Drag it to the desired position
- Release to drop
- Coordinates update in real-time
Method 4: Use My Location
Quickly center on your current location:
- Click the Use My Location button
- Grant location permission in your browser (if prompted)
- Map centers on your current GPS coordinates
- Marker is placed at your location
Method 5: Manual Entry
Enter coordinates directly if you already know them:
- Type latitude in the Latitude field (e.g.,
51.5074) - Type longitude in the Longitude field (e.g.,
-0.1278) - Marker moves to the entered coordinates
- Map pans to show the marker
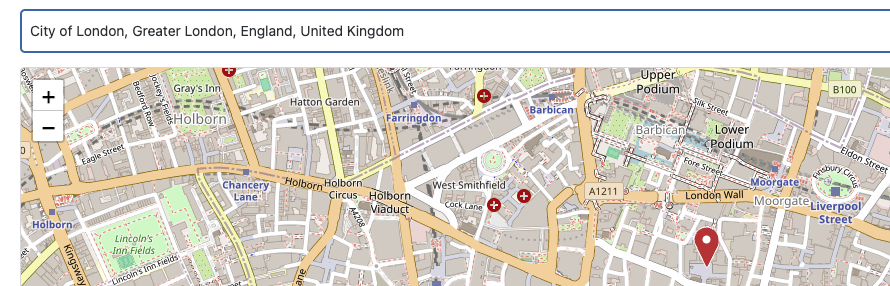
Address Geocoding
How Geocoding Works
The plugin uses the free Nominatim API (by OpenStreetMap) to convert addresses to coordinates:
- You type an address or postcode
- Plugin sends request to Nominatim
- Nominatim returns matching locations
- Map updates with the result
Autocomplete Suggestions
As you type, suggested addresses appear below the search field:
- Shows up to 5 matching results
- Click any suggestion to select it
- Appears after typing at least 3 characters
- Debounced to avoid excessive requests (500ms delay)
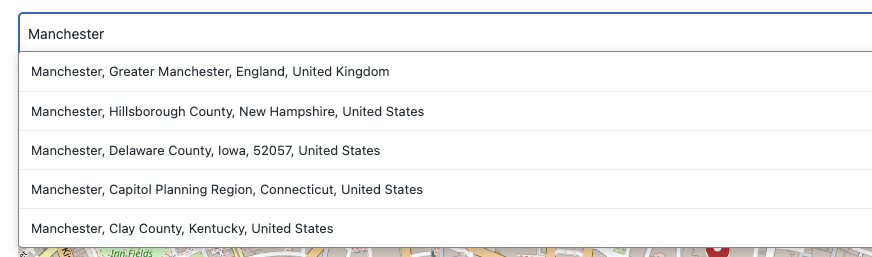
Address autocomplete suggestions
Supported Search Formats
You can search for:
- Postcodes: SW1A 2AA, 10001, etc.
- Full Addresses: 10 Downing Street, London
- Landmarks: Eiffel Tower, Big Ben
- Cities: London, New York
- Streets: Oxford Street, London (less precise)
Rate Limiting
Nominatim has a fair use policy of 1 request per second:
- Autocomplete is debounced (waits 500ms after you stop typing)
- Manual searches respect the 1 req/sec limit
- Results are cached for 24 hours to reduce requests
Custom Pin Colors
Each location can have a unique marker color on the frontend map:
Setting Pin Color
- In the metabox, find the Pin Color field
- Click to open the WordPress color picker
- Choose a color or enter a hex code
- Marker preview updates with the chosen color
- Save the post to apply the color
Using Custom Colors
Color-code locations by category:
- Blue: Main offices
- Green: Retail stores
- Orange: Warehouses
- Red: Service centers
The custom colors automatically apply when using Dynamic Locations mode in the widget.
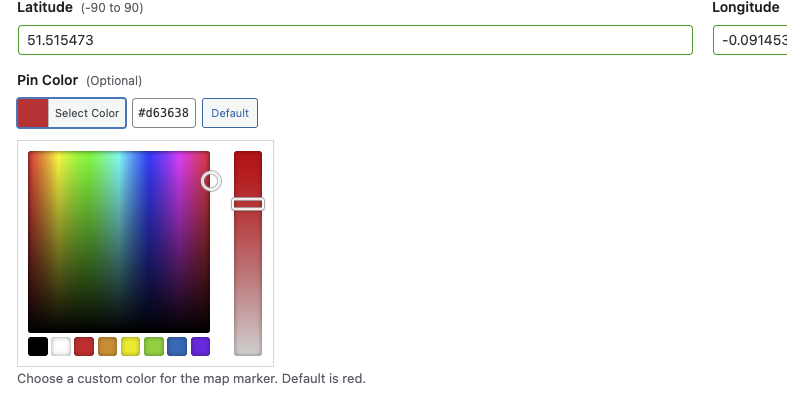
Pin color picker
Preview Links
Once coordinates are set, a preview link appears at the bottom of the metabox:
- Preview on OpenStreetMap - Opens location in new tab
- Useful for verifying the correct location
- Shows surrounding area and landmarks
Saving Coordinates
Coordinates are saved as WordPress post meta when you save the post:
_lmfe_latitude- Hidden field (underscore prefix)_lmfe_longitude- Hidden fieldlmfe_pin_color- Visible in Custom Fields (no underscore)
Troubleshooting the Metabox
Map Not Loading
If the map doesn't appear:
- Check browser console for JavaScript errors
- Ensure Leaflet.js is loading (check network tab)
- Disable other plugins that might conflict
- Clear browser cache
Search Not Working
If address search isn't returning results:
- Check your internet connection
- Try a more specific search (include city/country)
- Wait a moment if you've searched too quickly (rate limiting)
- Check if Nominatim API is accessible from your server
Coordinates Not Saving
If coordinates don't persist after saving:
- Ensure you have permission to edit the post
- Check for PHP errors in debug.log
- Verify post meta is being saved (use Query Monitor plugin)
- Try deactivating conflicting plugins
Map Styling & Customization
Customize the appearance and behavior of your maps to match your website's design and user experience goals.
Map Dimensions
Map Height
Control the vertical size of your map:
- Default: 400px
- Units: px, %, vh, em
- Responsive: Use % or vh for responsive heights
Height: 500px (Fixed)
Height: 100vh (Full viewport height)
Height: 50% (Half of container)
Map Width
Set to 100% by default to fill the column width. Can be customized using Elementor's width controls.
Zoom Settings
Default Zoom Level
Set the initial zoom when the map loads:
- 1-3: World/continent level
- 4-6: Country level
- 7-10: Region/state level
- 11-14: City level (default: 13)
- 15-18: Street level
- 19: Building level (max)
Zoom Controls
Enable or disable zoom in/out buttons:
- Enabled (default): Shows +/- buttons
- Disabled: Zoom only via scroll wheel
Scroll Wheel Zoom
Control whether users can zoom with mouse wheel:
- Enabled: Scroll to zoom
- Disabled (recommended for embedded maps): Prevents accidental zooming while scrolling page
Marker Clustering
When displaying many locations, clustering groups nearby markers for better performance and UX.
Enable Clustering
Toggle on to activate marker clustering:
- Markers close together are grouped into clusters
- Cluster shows the number of markers it contains
- Click cluster to zoom in and reveal individual markers
- Improves performance with 50+ markers
Cluster Radius
Distance in pixels within which markers are clustered:
- Default: 80px
- Smaller (40-60px): More individual markers visible
- Larger (100-150px): More aggressive clustering
Map Controls
Fullscreen Control
Add a button to expand map to fullscreen:
- Button appears in top-right corner
- Useful for maps with many locations
- Exit fullscreen with ESC key or button click
Locate Control
Add a "Find My Location" button:
- Centers map on user's current location
- Requires HTTPS
- User must grant location permission
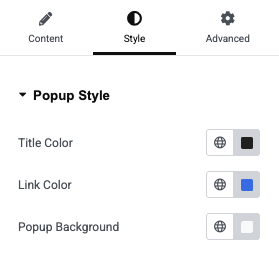
Popup Style Controls
Customize the appearance of marker popups using the Style tab in the widget settings:
Title Color
Set the color for popup titles.
- Default:
#222222(dark gray) - Click the color picker to choose a custom color
Link Color
Set the color for links within popups.
- Default:
#1a73e8(blue) - Applies to "View More" links and other clickable elements
Popup Background
Set the background color for the entire popup.
- Default:
#f9fafb(light gray) - Choose colors that complement your site design
Popup style color controls in Style tab
Custom CSS Styling
Advanced users can add custom CSS to style map elements:
Popup Styling Example
/* Custom popup styles */
.leaflet-popup-content-wrapper {
    background: #2c3e50;
    color: #fff;
    border-radius: 8px;
}

.leaflet-popup-content h3 {
    color: #3498db;
    margin-bottom: 10px;
}
Marker Styling Example
/* Custom marker shadows */
.leaflet-marker-shadow {
    opacity: 0.5;
}

/* Hide attribution (not recommended) */
.leaflet-control-attribution {
    display: none;
}Troubleshooting
Common issues and their solutions to help you get your maps working perfectly.
Map Not Displaying
Blank/Grey Map Area
If you see an empty grey box where the map should be:
- Check Elementor is active
- Navigate to Plugins → Installed Plugins
- Ensure "Elementor" is activated
- Plugin requires Elementor 3.0.0 or higher
- Clear browser cache
- Hard refresh: Ctrl+F5 (Windows) or Cmd+Shift+R (Mac)
- Clear browser cache completely
- Check for JavaScript errors
- Open browser console (F12 → Console tab)
- Look for errors related to Leaflet or LMFE
- Resolve conflicts with other plugins
- Verify Leaflet is loading
- Check browser Network tab for leaflet.js
- Should load from plugin's assets folder
- Check for 404 errors
Map Not Responsive
If map doesn't adapt to screen size:
- Use percentage or vh units for height
- Check Elementor column width settings
- Test on actual devices, not just browser resize
Locations Not Showing
Manual Mode - No Markers Visible
- Verify coordinates are entered
- Check latitude/longitude values are present
- Ensure lat is between -90 and 90
- Ensure lng is between -180 and 180
- Check zoom level
- Map might be too zoomed out
- Try zoom level 13 for city-level view
- Inspect map center
- Map center should be near your markers
- Auto-center may not work with invalid coordinates
Dynamic Mode (Pro) - No Markers Visible
- Check field mapping
- Verify latitude/longitude field names are correct
- Field names are case-sensitive
- Check for typos
- Verify posts have coordinates
- Edit a location post
- Confirm metabox has lat/lng values
- Save post after setting coordinates
- Check query settings
- Ensure "Posts Per Page" isn't set to 0
- Check Include/Exclude filters
- Verify post status is "publish"
- Inspect browser console
- Look for AJAX errors
- Check if location data is being fetched
- Verify JSON format is valid
Geocoding Issues (Pro)
Address Search Returns No Results
- Use more specific addresses - Include city, state, country
- Try postcodes - Most accurate for geocoding
- Check internet connection - Nominatim requires online access
- Wait between searches - Nominatim limits to 1 request/second
- Try alternative search terms - Use landmarks or full addresses
Autocomplete Not Working
- Type at least 3 characters before suggestions appear
- Wait 500ms after typing (debounce delay)
- Check browser console for API errors
- Verify Nominatim API is accessible from your server
"Too Many Requests" Error
Nominatim enforces a 1 request per second limit:
- Wait 1-2 seconds between searches
- Results are cached for 24 hours
- Avoid rapid autocomplete typing
Performance Issues
Map Loads Slowly
- Enable marker clustering - Reduces rendering overhead
- Limit number of markers - Use "Posts Per Page" to cap at 50-100
- Optimize images - Compress popup images
- Use caching plugin - Cache Elementor pages
Map Conflicts with Other Plugins
If another plugin also uses Leaflet or OpenStreetMap:
- Check for JavaScript console errors
- Try deactivating other map plugins temporarily
- Plugin uses unique handles to avoid conflicts
- Contact support if conflicts persist
Editor Preview Issues (Pro)
Map Not Updating in Elementor Editor
- Save and refresh the page
- Check browser console for errors
- Clear Elementor cache: Tools → Regenerate Files
- Ensure editor preview assets are loading
Custom Pin Colors Not Showing in Editor
This is normal - custom colors only appear on frontend after publishing. The editor shows default markers.
Getting Further Help
Before Contacting Support
Gather this information:
- WordPress version
- PHP version
- Elementor version
- Plugin version (Free or Pro)
- Browser console errors (screenshot)
- Steps to reproduce the issue
Support Channels
- Free Version: WordPress.org Support Forum
- Pro Version: ThemeCanvas Support Portal
- Documentation: Online Docs
define('WP_DEBUG', true); to wp-config.php.
Developer Reference
Technical documentation for developers who want to extend or customize the plugin.
Post Meta Field Names
Coordinate Fields (Pro)
When using the plugin's metabox, coordinates are stored as:
| Meta Key | Description | Format |
|---|---|---|
_lmfe_latitude |
Latitude coordinate (hidden field) | Float: -90 to 90 |
_lmfe_longitude |
Longitude coordinate (hidden field) | Float: -180 to 180 |
lmfe_pin_color |
Custom marker color (visible field) | Hex: #RRGGBB |
Retrieving Coordinates Programmatically
// Get coordinates for a post
$post_id = 123;
$lat = get_post_meta($post_id, '_lmfe_latitude', true);
$lng = get_post_meta($post_id, '_lmfe_longitude', true);
$pin_color = get_post_meta($post_id, 'lmfe_pin_color', true);

if ($lat && $lng) {
    echo "Location: {$lat}, {$lng}";
    echo "Pin Color: {$pin_color}";
}
Setting Coordinates Programmatically
// Set coordinates for a post
$post_id = 123;
update_post_meta($post_id, '_lmfe_latitude', 51.5074);
update_post_meta($post_id, '_lmfe_longitude', -0.1278);
update_post_meta($post_id, 'lmfe_pin_color', '#3498db');
Custom Field Integration
Using with ACF (Advanced Custom Fields)
The plugin automatically detects ACF fields. Create two number fields:
// ACF field group example
'fields' => [
    [
        'key' => 'field_lat',
        'name' => 'my_custom_lat',
        'type' => 'number',
    ],
    [
        'key' => 'field_lng',
        'name' => 'my_custom_lng',
        'type' => 'number',
    ],
]

// In widget settings:
Latitude Field: my_custom_lat
Longitude Field: my_custom_lng
Using with Metabox.io
Similar to ACF, create custom fields and reference them by name:
// Metabox.io field registration
'fields' => [
    [
        'id' => 'store_latitude',
        'name' => 'Latitude',
        'type' => 'number',
    ],
    [
        'id' => 'store_longitude',
        'name' => 'Longitude',
        'type' => 'number',
    ],
]

// In widget settings:
Latitude Field: store_latitude
Longitude Field: store_longitude
Filters and Actions
Available Filters
Modify Query Arguments
/**
 * Filter location query arguments
 *
 * @param array $args WP_Query arguments
 * @param array $settings Widget settings
 */
add_filter('lmfe_location_query_args', function($args, $settings) {
    // Only show locations from last 30 days
    $args['date_query'] = [
        [
            'after' => '30 days ago',
        ],
    ];
    return $args;
}, 10, 2);
Modify Location Data
/**
 * Filter location data before sending to map
 *
 * @param array $location Location data array
 * @param int $post_id Post ID
 */
add_filter('lmfe_location_data', function($location, $post_id) {
    // Add custom data to popup
    $location['custom_field'] = get_post_meta($post_id, 'custom_field', true);
    return $location;
}, 10, 2);
Customize Popup Content
/**
 * Filter popup HTML content
 *
 * @param string $content Popup HTML
 * @param int $post_id Post ID
 */
add_filter('lmfe_popup_content', function($content, $post_id) {
    // Add custom button to popup
    $content .= 'View Details';
    return $content;
}, 10, 2);
Available Actions
Before Map Renders
/**
 * Action before map renders
 *
 * @param array $settings Widget settings
 */
add_action('lmfe_before_map_render', function($settings) {
    // Enqueue custom scripts or styles
    wp_enqueue_script('my-custom-map-script');
});
After Location Meta Save
/**
 * Action after coordinates are saved
 *
 * @param int $post_id Post ID
 * @param float $lat Latitude
 * @param float $lng Longitude
 */
add_action('lmfe_location_saved', function($post_id, $lat, $lng) {
    // Trigger custom actions (e.g., geocode reverse lookup)
    do_something_with_coordinates($lat, $lng);
}, 10, 3);
Creating Custom Map Widgets
Extend the Base Widget
namespace MyPlugin;

use LMFE\Widgets\Location_Map_Widget;

class Custom_Map_Widget extends Location_Map_Widget {

    public function get_name() {
        return 'my_custom_map';
    }

    public function get_title() {
        return __('My Custom Map', 'my-plugin');
    }

    protected function register_controls() {
        parent::register_controls();

        // Add your custom controls here
        $this->add_control(
            'my_custom_setting',
            [
                'label' => __('Custom Setting', 'my-plugin'),
                'type' => \Elementor\Controls_Manager::TEXT,
            ]
        );
    }
}
Database Schema
Options Table
| Option Name | Description | Type |
|---|---|---|
lmfe_registered_cpts |
Array of registered location CPTs | Serialized array |
lmfe_enabled_post_types |
Post types with metabox enabled | Serialized array |
Querying Locations Programmatically
// Get all posts with coordinates
$locations = new WP_Query([
    'post_type' => 'any',
    'posts_per_page' => -1,
    'meta_query' => [
        'relation' => 'AND',
        [
            'key' => '_lmfe_latitude',
            'compare' => 'EXISTS',
        ],
        [
            'key' => '_lmfe_longitude',
            'compare' => 'EXISTS',
        ],
    ],
]);

foreach ($locations->posts as $location) {
    $lat = get_post_meta($location->ID, '_lmfe_latitude', true);
    $lng = get_post_meta($location->ID, '_lmfe_longitude', true);
    // Process location
}
REST API Integration
Exposing Coordinates via REST API
// Register coordinates in REST API
add_action('rest_api_init', function() {
    register_rest_field('locations', 'coordinates', [
        'get_callback' => function($post) {
            return [
                'lat' => get_post_meta($post['id'], '_lmfe_latitude', true),
                'lng' => get_post_meta($post['id'], '_lmfe_longitude', true),
            ];
        },
        'schema' => [
            'description' => 'Location coordinates',
            'type' => 'object',
        ],
    ]);
});floatval() for coordinates and validate ranges.
Frequently Asked Questions
General Questions
Do I need an API key to use this plugin?
No. The plugin uses OpenStreetMap which is completely free and doesn't require any API keys. This makes setup much simpler than Google Maps-based solutions.
Can I use this plugin without Elementor Pro?
Yes. The plugin only requires the free version of Elementor. Elementor Pro is not needed.
What's the difference between Free and Pro versions?
The Free version supports manual location entry within the widget. The Pro version adds:
- Dynamic location loading from WordPress posts/CPTs
- Built-in Locations custom post type
- Visual map metabox with geocoding
- Custom pin colors
- Post Type Manager
- Advanced query controls
How many locations can I display on one map?
Unlimited. However, for performance reasons, we recommend enabling marker clustering when displaying more than 50 locations.
Technical Questions
Does this work with WooCommerce?
Yes (Pro). You can enable the metabox on the Products post type to add locations to products, perfect for store locators.
Can I import locations from a CSV file?
Yes, with tools. Use a plugin like WP All Import to import posts with custom fields. Map your CSV columns to _lmfe_latitude and _lmfe_longitude.
Is the plugin GDPR compliant?
Yes. The plugin doesn't collect any user data. The "Use My Location" feature requires user permission and only uses coordinates temporarily in the browser - nothing is stored or transmitted.
Does it work with caching plugins?
Yes. The plugin is compatible with caching plugins. Maps are generated client-side so they work even with full-page caching enabled.
Can I use custom marker icons?
Partially. The Pro version allows custom pin colors via the metabox. Custom icon shapes would require custom CSS/JavaScript - contact support for guidance.
Pro Version Questions
How does the geocoding work?
The plugin uses Nominatim (OpenStreetMap's geocoding service) to convert addresses to coordinates. It's free but has a 1 request per second limit. Results are cached for 24 hours to minimize requests.
Can I use my own geocoding service?
Not currently. The plugin is designed to work with Nominatim. Custom geocoding services would require code modifications.
Will my existing locations work if I upgrade from Free to Pro?
Yes. Manual locations created in the Free version continue to work in Pro. You can also start using the dynamic features alongside manual locations.
Can I have multiple location CPTs?
Yes. The Pro version allows you to create multiple custom post types for different location categories (Stores, Offices, Branches, etc.). You can also display multiple CPTs on the same map by selecting multiple post types in the widget's Post Types field.
Troubleshooting Questions
Why is my map showing grey tiles?
This usually means the map tiles aren't loading from OpenStreetMap. Check your internet connection and ensure your server can access external URLs. Some hosting providers block external requests by default.
The editor preview doesn't match the frontend. Why?
Some features (like custom pin colors) only appear on the published page, not in the Elementor editor. This is normal and helps keep the editor performant.
Can I use this plugin on localhost?
Mostly yes. Maps and most features work fine. However, geocoding requires internet access to Nominatim, and "Use My Location" requires HTTPS (works on localhost without HTTPS as an exception).
Licensing Questions
Can I use the Pro version on multiple sites?
Check your license terms. Typically:
- Single Site License: One production site
- Multi-Site License: Up to 5 sites
- Developer License: Unlimited sites
Do I get updates and support?
Yes. Pro licenses include 1 year of updates and support. After that, you can renew for continued updates or continue using the last version you received.
Changelog
Version 1.2.0 - January 9, 2026
- Added: Complete location management system with CPT and metabox (Pro)
- Added: Interactive map metabox with visual coordinate selection (Pro)
- Added: Address geocoding and autocomplete via Nominatim (Pro)
- Added: "Use My Location" browser geolocation (Pro)
- Added: Custom pin color picker in metabox (Pro)
- Added: Post Type Manager to enable metabox on existing CPTs (Pro)
- Added: Admin settings page for CPT management (Pro)
- Added: Coordinates column in admin post lists (Pro)
- Added: Auto-detection of plugin fields in widget
- Fixed: Custom pin colors now display correctly on frontend
- Improved: Editor preview now shows custom colored pins
- Improved: Plugin renamed for WordPress.org trademark compliance
Version 1.0.0 - Initial Release
- Added: Manual location entry mode
- Added: Dynamic location loading from posts/CPTs (Pro)
- Added: Marker clustering support
- Added: Customizable popups with HTML support
- Added: Map styling controls
- Added: Zoom and control settings
- Added: ACF and custom field integration (Pro)
- Added: Advanced query controls (Pro)
- Added: Elementor editor preview (Pro)